【Java开发】Java NIO

Java NIO(New Input/Output)是Java 1.4中引入的一套新的I/O API,旨在提供比传统Java I/O更高效的I/O操作。它通过非阻塞模式、通道(Channels)、缓冲区(Buffers)等机制,增强了Java处理高并发和大数据量时的性能,尤其适合需要高吞吐量的网络应用开发。

1. Java NIO 核心概念

NIO(New I/O)的设计目标是解决传统 I/O(BIO,Blocking I/O)在处理大量并发连接时的性能瓶颈。传统 I/O 在网络通信中主要使用阻塞式 I/O,为每个连接分配一个线程。当连接数量增加时,系统性能将受到严重影响,线程资源成为关键瓶颈。而 NIO 提供了非阻塞 I/O 和 I/O 多路复用,可以在单个线程中处理多个并发连接,从而在网络传输中显著提高性能。

  • Channel(通道):NIO中的通道类似于传统I/O中的“流”,但不同的是通道是双向的,可以用于读取、写入或者同时执行这两种操作。常见的通道类型包括FileChannelSocketChannelServerSocketChannelDatagramChannel等。

  • Buffer(缓冲区):缓冲区是NIO中用于存储数据的容器。与传统I/O的直接读写数据不同,NIO通过先将数据写入缓冲区,再由缓冲区发送到通道,或从通道中读取数据放入缓冲区。这种机制使得数据可以被更有效地管理。常见的缓冲区有ByteBufferCharBufferIntBuffer等,支持多种基本数据类型。

  • Selector(选择器):选择器用于管理多个通道,允许单线程处理多个通道的事件(如连接请求、读写操作等),实现非阻塞I/O的多路复用。它使得一个线程可以监听多个通道的状态(如读、写、连接等),从而避免了每个连接一个线程的资源开销。

2. 主要特性

  • 非阻塞I/O:传统I/O是阻塞的,比如当执行read()时,程序会一直等待直到数据完全读取。而NIO允许非阻塞操作,线程在执行I/O操作时无需等待,可以继续执行其他任务。这对于需要处理大量并发请求的服务器应用非常有用。

  • 多路复用:通过Selector,Java NIO支持单线程管理多个通道的连接请求,这种技术称为“多路复用”(Multiplexing)。相比传统的“一个请求一个线程”模式,NIO的多路复用可以显著减少线程开销。

3. Java NIO 中的核心类和接口

  • ByteBuffer:这是NIO中最常用的缓冲区类,主要用于字节存储。ByteBuffer支持直接缓冲区(Direct Buffer)和非直接缓冲区。直接缓冲区在Java堆外直接分配内存,与操作系统底层的I/O操作更加接近,适合大数据的快速传输。

  • FileChannel:用于文件的通道,通过FileInputStreamFileOutputStreamRandomAccessFile等获取。FileChannel可以从文件中读取数据或写入数据,还支持内存映射文件(MappedByteBuffer)等高效操作。

  • SocketChannel、ServerSocketChannel、DatagramChannel:这些通道用于网络通信。SocketChannel可以用于TCP客户端,ServerSocketChannel用于TCP服务器,而DatagramChannel用于UDP通信。

  • SelectorSelector通过select()方法监听多个通道的事件(如读、写、连接等),并返回已准备就绪的通道。这种机制极大地提高了服务器的并发性能。

4. Java NIO 的操作流程

使用Java NIO进行非阻塞I/O的流程通常如下:

  1. 创建通道:打开一个通道,例如FileChannelSocketChannel
  2. 配置缓冲区:为通道创建一个或多个缓冲区,用于存储数据。
  3. 写入或读取数据:将数据写入缓冲区或从缓冲区读取数据,通过通道传输。
  4. 非阻塞模式与选择器:将通道配置为非阻塞模式,将通道注册到选择器上,通过选择器监听并处理多个通道的事件。
  5. 事件处理:通过选择器的select()方法获取就绪的通道集合,根据不同事件执行相应的操作(读、写、连接等)。

5. 代码示例

以下是一个简单的NIO示例,展示如何使用SelectorSocketChannel处理非阻塞网络通信。

1
2
3
4
5
6
7
8
9
10
11
12
13
14
15
16
17
18
19
20
21
22
23
24
25
26
27
28
29
30
31
32
33
34
35
36
37
38
39
40
import java.io.IOException;
import java.net.InetSocketAddress;
import java.nio.ByteBuffer;
import java.nio.channels.SelectionKey;
import java.nio.channels.Selector;
import java.nio.channels.ServerSocketChannel;
import java.nio.channels.SocketChannel;
import java.util.Iterator;

public class NIOServerExample {
public static void main(String[] args) throws IOException {
Selector selector = Selector.open(); // 创建选择器
ServerSocketChannel serverSocket = ServerSocketChannel.open();
serverSocket.bind(new InetSocketAddress("localhost", 8080));
serverSocket.configureBlocking(false); // 设置为非阻塞模式
serverSocket.register(selector, SelectionKey.OP_ACCEPT); // 注册选择器

while (true) {
selector.select(); // 阻塞直到有事件触发
Iterator<SelectionKey> keys = selector.selectedKeys().iterator();

while (keys.hasNext()) {
SelectionKey key = keys.next();
keys.remove();

if (key.isAcceptable()) { // 处理连接请求
ServerSocketChannel server = (ServerSocketChannel) key.channel();
SocketChannel client = server.accept();
client.configureBlocking(false);
client.register(selector, SelectionKey.OP_READ); // 注册读事件
} else if (key.isReadable()) { // 处理读请求
SocketChannel client = (SocketChannel) key.channel();
ByteBuffer buffer = ByteBuffer.allocate(256);
client.read(buffer);
System.out.println("Received message: " + new String(buffer.array()).trim());
}
}
}
}
}

在上面的代码中:

  • 创建了一个Selector用于管理多个通道。
  • 通过ServerSocketChannel建立服务器套接字,并设置为非阻塞模式。
  • 将通道注册到选择器上,监听OP_ACCEPT(连接请求)事件。
  • 选择器等待事件触发,通过迭代处理每个就绪的SelectionKey,实现非阻塞I/O。

6. Java NIO的优缺点

传统 IO 基于字节流或字符流(如 FileInputStream、BufferedReader 等)进行文件读写,以及使用 Socket 和 ServerSocket 进行网络传输。
NIO 使用通道(Channel)和缓冲区(Buffer)进行文件操作,以及使用 SocketChannel 和 ServerSocketChannel 进行网络传输。
传统 IO 采用阻塞式模型,对于每个连接,都需要创建一个独立的线程来处理读写操作。当一个线程在等待 I/O 操作时,无法执行其他任务。这会导致大量线程的创建和销毁,以及上下文切换,降低了系统性能。
NIO 使用非阻塞模型,允许线程在等待 I/O 时执行其他任务。这种模式通过使用选择器(Selector)来监控多个通道(Channel)上的 I/O 事件,实现了更高的性能和可伸缩性。

以下是 NIO 在网络传输中优于传统 I/O 的原因:
①、NIO 支持非阻塞 I/O,这意味着在执行 I/O 操作时,线程不会被阻塞。这使得在网络传输中可以有效地管理大量并发连接(数千甚至数百万)。而在操作文件时,这个优势没有那么明显,因为文件读写通常不涉及大量并发操作。
②、NIO 支持 I/O 多路复用,这意味着一个线程可以同时监视多个通道(如套接字),并在 I/O 事件(如可读、可写)准备好时处理它们。这大大提高了网络传输中的性能,因为单个线程可以高效地管理多个并发连接。操作文件时这个优势也无法提现出来。
③、NIO 提供了 ByteBuffer 类,可以高效地管理缓冲区。这在网络传输中很重要,因为数据通常是以字节流的形式传输。操作文件的时候,虽然也有缓冲区,但优势仍然不够明显。

  • 优点

    • 高性能:支持非阻塞I/O和多路复用,大大减少了线程开销和阻塞时间。
    • 更适合网络编程:NIO的结构适合开发高并发的网络应用程序,特别是I/O密集型服务。
  • 缺点

    • 开发复杂度高:与传统I/O相比,NIO的编程复杂度更高,需要处理选择器、缓冲区等。
    • 适用场景有限:适合I/O密集型应用,但对CPU密集型应用的性能提升有限。

NIO 和传统 IO 在操作文件时的差异

1
2
3
4
5
6
7
8
9
10
11
12
13
14
15
16
17
18
19
20
21
22
23
24
25
26
27
28
29
30
31
32
33
34
35
36
37
38
39
40
41
42
43
44
45
46
47
48
49
50
51
52
53
54
55
56
57
58
59
60
61
62
63
64
65
66
67
68
69
70
71
import java.io.*;
import java.nio.ByteBuffer;
import java.nio.channels.FileChannel;
import java.util.HashSet;
import java.util.LinkedList;

public class Main {
// 使用传统 I/O 方法传输文件
private long transferFile(File source, File des) throws IOException{
long startTime = System.currentTimeMillis();

if(!des.exists())
des.createNewFile();
// 创建输入输出流
BufferedInputStream bis = new BufferedInputStream(new FileInputStream(source));
BufferedOutputStream bos = new BufferedOutputStream(new FileOutputStream(des));

// 使用数组传输数据
byte[] bytes = new byte[1024*1024];
int len;
while((len = bis.read(bytes)) != -1){
bos.write(bytes, 0,len);
}

long endTime = System.currentTimeMillis();
return endTime - startTime;
}

// 使用 NIO 方式传输文件
private long transferFileWithNIO(File source, File des) throws IOException{
long startTime = System.currentTimeMillis();

if(!des.exists())
des.createNewFile();

// 创建随机存取文件对象
RandomAccessFile read = new RandomAccessFile(source, "rw");
RandomAccessFile write = new RandomAccessFile(des, "rw");

// 创建文件通道
FileChannel readChannel = read.getChannel();
FileChannel writeChannel = write.getChannel();

// 创建并使用ByteBuffer 传输数据
ByteBuffer byteBuffer = ByteBuffer.allocate(1024 * 1024);
while(readChannel.read(byteBuffer) > 0){
byteBuffer.flip();
writeChannel.write(byteBuffer);
byteBuffer.clear();
}

// 关闭文件通道
writeChannel.close();;
readChannel.close();
long endTime = System.currentTimeMillis();
return endTime - startTime;
}

public static void main(String[] args) throws IOException {
Main transferfile = new Main();
File source = new File("/home/dell/下载/Clash.for.Windows-0.20.35-win.7z");
File des = new File("a.7z");
File nio = new File("b.7z");

// 比较时间
long time = transferfile.transferFile(source, des);
System.out.println(time + "普通字节流时间");
long timeNio = transferfile.transferFileWithNIO(source, nio);
System.out.println(timeNio + "NIO时间");
}
}

输出:

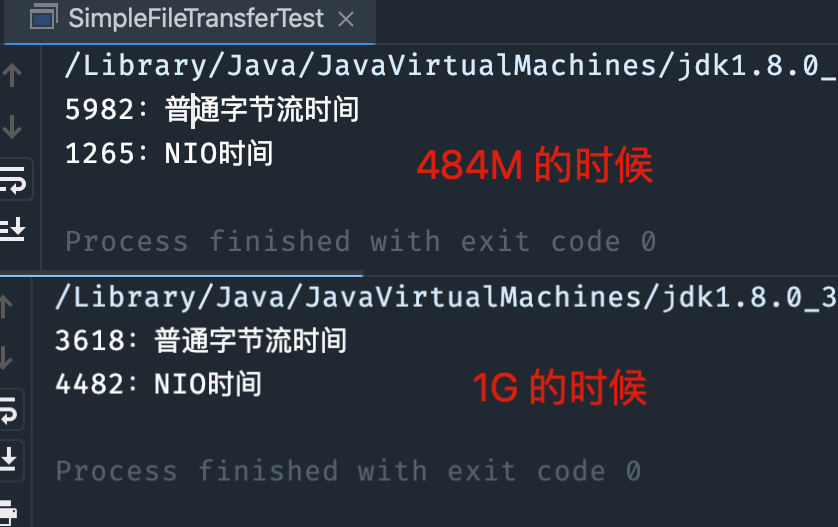
文件越大的情况下,竟然普通字节流(传统 IO)的速度更快,NIO的魅力主要是在网络当中

NIO 和传统 IO 在网络传输中的差异

IO,用的套接字,其中
Socket 和 ServerSocket 是传统的阻塞式 I/O 编程方式,用于建立和管理 TCP 连接。
Socket:表示客户端套接字,负责与服务器端建立连接并进行数据的读写。
ServerSocket:表示服务器端套接字,负责监听客户端连接请求。当有新的连接请求时,ServerSocket 会创建一个新的 Socket 实例,用于与客户端进行通信。
在传统阻塞式 I/O 编程中,每个连接都需要一个单独的线程进行处理,这导致了在高并发场景下的性能问题。

1
2
3
4
5
6
7
8
9
10
11
12
13
14
15
16
17
18
19
20
21
22
23
public class IOSever {
public static void main(String[] args){
try{
ServerSocket serverSocket = new ServerSocket(8080);

while(true){
Socket client = serverSocket.accept();
InputStream in = client.getInputStream();
OutputStream out = client.getOutputStream();

byte[] buffer = new byte[1024];
int bytesRead = in.read(buffer);
out.write(buffer, 0, bytesRead);

in.close();
out.close();
client.close();
}
} catch (IOException e) {
throw new RuntimeException(e);
}
}
}

NIO,为了解决传统阻塞式 I/O 的性能问题,Java NIO 引入了 ServerSocketChannel 和 SocketChannel。它们是非阻塞 I/O,可以在单个线程中处理多个连接。
ServerSocketChannel:类似于 ServerSocket,表示服务器端套接字通道。它负责监听客户端连接请求,并可以设置为非阻塞模式,这意味着在等待客户端连接请求时不会阻塞线程。
SocketChannel:类似于 Socket,表示客户端套接字通道。它负责与服务器端建立连接并进行数据的读写。SocketChannel 也可以设置为非阻塞模式,在读写数据时不会阻塞线程。

Selector 是 Java NIO 中的一个关键组件,用于实现 I/O 多路复用。它允许在单个线程中同时监控多个 ServerSocketChannel 和 SocketChannel,并通过 SelectionKey 标识关注的事件。当某个事件发生时,Selector 会将对应的 SelectionKey 添加到已选择的键集合中。通过使用 Selector,可以在单个线程中同时处理多个连接,从而有效地提高 I/O 操作的性能,特别是在高并发场景下。

1
2
3
4
5
6
7
8
9
10
11
12
13
14
15
16
17
18
19
20
21
22
23
24
25
26
27
28
29
30
31
32
33
34
35
36
37
38
39
40
41
42
43
44
45
46
47
48
49
50
51
52
53
54
55
56
57
public class NIOServer {
public static void main(String[] args){
try {
// 创建ServerSocketChannel
ServerSocketChannel serverSocketChannel = ServerSocketChannel.open();
// 绑定端口
serverSocketChannel.bind(new InetSocketAddress(8081));
// 设置为非阻塞模式
serverSocketChannel.configureBlocking(false);

// 创建 Selector
Selector selector = Selector.open();
// 将ServerSocketChannel 注册到 Selector ,关注 OP_ACCEPT 事件
serverSocketChannel.register(selector, SelectionKey.OP_ACCEPT);

// 无限循环,处理事件
while (true){
// 阻塞直到有事件发生
selector.select();
// 获取发生事件的 SelectionKey
Iterator<SelectionKey> iterator = selector.selectedKeys().iterator();
while(iterator.hasNext()){
SelectionKey key = iterator.next();
// 处理完成后,从selectdKeys集合中删除
iterator.remove();

// 判断事件类型
if(key.isAcceptable()){
// 有新的连接请求
ServerSocketChannel server = (ServerSocketChannel) key.channel();
// 接受连接
SocketChannel client = server.accept();
// 设置为非阻塞模式
client.configureBlocking(false);
// 将新的SocketChannel 注册到Selector,关注 OP_READ事件
client.register(selector, SelectionKey.OP_READ);
}else if(key.isReadable()){
// 有数据可读
SocketChannel client = (SocketChannel) key.channel();
// 创建 ByteBuffer 缓冲区
ByteBuffer buffer = ByteBuffer.allocate(1024);
// 从 SocketChannel 中读取并写入 ByteBuffer
client.read(buffer);
// 翻转ByteBuffer,准备读取
buffer.flip();
// 将数据从ByteBuffer写回到 SocketChannel
client.write(buffer);
// 关闭连接
client.close();
}
}
}
} catch (IOException e) {
throw new RuntimeException(e);
}
}
}

上面的代码创建了一个基于 Java NIO 的简单 TCP 服务器。它使用 ServerSocketChannel 和 Selector(后面会讲) 实现了非阻塞 I/O 和 I/O 多路复用。服务器循环监听事件,当有新的连接请求时,接受连接并将新的 SocketChannel 注册到 Selector,关注 OP_READ 事件。当有数据可读时,从 SocketChannel 中读取数据并写入 ByteBuffer,然后将数据从 ByteBuffer 写回到 SocketChannel。

1
2
3
4
5
6
7
8
9
10
11
12
13
14
15
16
17
18
19
20
21
22
23
24
25
26
27
28
29
30
31
32
33
34
35
36
37
38
39
40
41
42
43
44
45
46
47
48
49
50
51
52
53
54
55
56
57
58
59
60
public class TestClient {
public static void main(String[] args) throws InterruptedException{
int clientCount = 1000;
ExecutorService executorServiceIO = Executors.newFixedThreadPool(10);
ExecutorService executorServiceNIO = Executors.newFixedThreadPool(10);

// 使用传统IO的客户端
Runnable ioClient = () -> {
try{
Socket socket = new Socket("localhost", 8080);
OutputStream out = socket.getOutputStream();
InputStream in = socket.getInputStream();
out.write("hello 你好啊".getBytes());
byte[] buffer = new byte[1024];
in.read(buffer);
in.close();
out.close();
socket.close();
} catch (Exception e) {
throw new RuntimeException(e);
}
};

// 使用传统IO的客户端
Runnable nioClient = () -> {
try{
SocketChannel socketChannel = SocketChannel.open();
socketChannel.connect(new InetSocketAddress("localhost", 8081));
ByteBuffer buffer = ByteBuffer.wrap("你好啊 这个是nio".getBytes());
socketChannel.write(buffer);
buffer.clear();
socketChannel.read(buffer);
socketChannel.close();
} catch (Exception e) {
throw new RuntimeException(e);
}
};

// 分别测试性能
long startTime, endTime;

startTime = System.currentTimeMillis();
for(int i = 0; i < clientCount; i++){
executorServiceIO.execute(ioClient);
}
executorServiceIO.shutdown();
executorServiceIO.awaitTermination(1, TimeUnit.MINUTES);
endTime = System.currentTimeMillis();
System.out.println("传统IO服务器处理" + clientCount + "个客户端耗时" + (endTime - startTime) + "ms");

startTime = System.currentTimeMillis();
for(int i = 0; i < clientCount; i++){
executorServiceNIO.execute(nioClient);
}
executorServiceNIO.shutdown();
executorServiceNIO.awaitTermination(1, TimeUnit.MINUTES);
endTime = System.currentTimeMillis();
System.out.println("NIO服务器处理" + clientCount + "个客户端耗时" + (endTime - startTime) + "ms");
}
}

可以看出NIO快了一些

NIO、BIO和AIO的区别

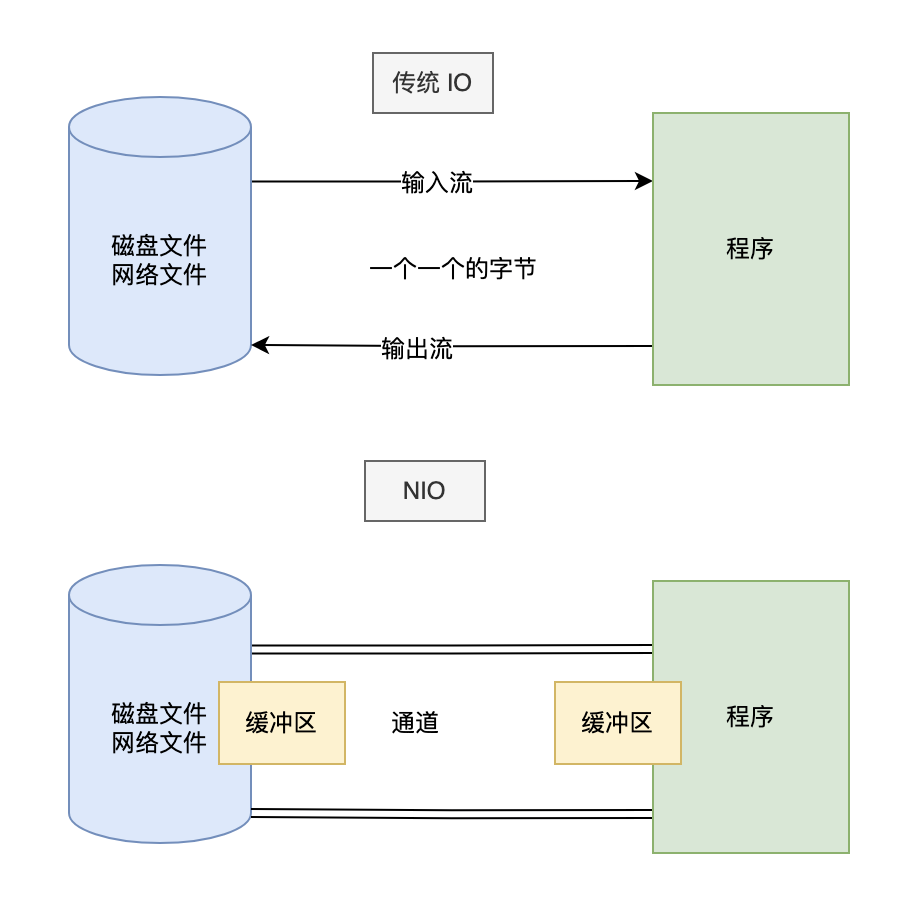
NIO 与原来的 I/O 有同样的作用和目的, 他们之间最重要的区别是数据打包和传输的方式。原来的 I/O 以流的方式处理数据,而 NIO 以块的方式处理数据。
面向流的 I/O 系统一次一个字节地处理数据。一个输入流产生一个字节的数据,一个输出流消费一个字节的数据。
面向块的 I/O 系统以块的形式处理数据。每一个操作都在一步中产生或者消费一个数据块。按块处理数据比按(流式的)字节处理数据要快得多。但是面向块的 I/O 缺少一些面向流的 I/O 所具有的优雅性和简单性。

Java AIO,全称 Asynchronous IO,是异步非阻塞的 IO。是一种非阻塞异步的通信模式。
在 NIO 的基础上引入了新的异步通道的概念,并提供了异步文件通道和异步套接字通道的实现。

BIO (Blocking I/O):同步阻塞 I/O 模式。这种模式下,我们的工作模式是先来到厨房,开始烧水,并坐在水壶面前一直等着水烧开。
NIO (New I/O):同步非阻塞模式。这种模式下,我们的工作模式是先来到厨房,开始烧水,但是我们不一直坐在水壶前面等,而是回到客厅看电视,然后每隔几分钟到厨房看一下水有没有烧开。
AIO (Asynchronous I/O):异步非阻塞 I/O 模型。这种模式下,我们的工作模式是先来到厨房,开始烧水,我们不一直坐在水壶前面等,也不隔一段时间去看一下,而是在客厅看电视,水壶上面有个开关,水烧开之后他会通知我。

阻塞 VS 非阻塞:人是否坐在水壶前面一直等。
同步 VS 异步:水壶是不是在水烧开之后主动通知人。

BIO 方式适用于连接数目比较小且固定的架构
NIO 方式适用于连接数目多且连接比较短(轻操作)的架构,比如聊天服务器,并发局限于应用中,编程比较复杂
AIO 方式适用于连接数目多且连接比较长(重操作)的架构,比如相册服务器,充分调用 OS 参与并发操作

1
2
3
4
5
6
7
8
9
10
11
12
13
14
15
16
17
18
19
20
21
22
23
24
25
26
27
28
29
30
31
32
33
34
35
36
37
38
39
40
41
42
43
public class BioFileDemo {
public static void main(String[] args){
BioFileDemo demo = new BioFileDemo();
demo.writeFile();
demo.readFile();
}

public void writeFile(){
String filename = "logs/itdas/dasda.txt";
try {
FileWriter fileWriter = new FileWriter(filename);
BufferedWriter bufferedWriter = new BufferedWriter(fileWriter);

bufferedWriter.write("dasdasdasdasd");
bufferedWriter.newLine();

System.out.println("写入完成");
bufferedWriter.close();
fileWriter.close();
} catch (IOException e) {
throw new RuntimeException(e);
}
}

public void readFile(){
String filename = "logs/itdas/dasda.txt";
try{
FileReader fileReader = new FileReader(filename);
BufferedReader bufferedReader = new BufferedReader(fileReader);

String line;
while((line = bufferedReader.readLine()) != null){
System.out.println(line);
}
bufferedReader.close();
fileReader.close();
} catch (FileNotFoundException e) {
throw new RuntimeException(e);
} catch (IOException e) {
throw new RuntimeException(e);
}
}
}

这个示例展示了如何使用 Java 中的传统阻塞 I/O(BIO)对文件进行读写操作。在 writeFile() 方法中,我们首先创建一个 FileWriter 对象,并使用 BufferedWriter 进行缓冲写入。接着,使用 bufferedWriter.write() 方法将字符串写入文件,然后调用 bufferedWriter.newLine() 方法添加换行符。最后,关闭 BufferedWriter 和 FileWriter。在 readFile() 方法中,我们创建一个 FileReader 对象,并使用 BufferedReader 进行缓冲读取。然后通过调用 bufferedReader.readLine() 方法循环读取文件内容,直到返回 null 表示读取完毕。最后,关闭 BufferedReader 和 FileReader。

接下来是 NIO 的。

1
2
3
4
5
6
7
8
9
10
11
12
13
14
15
16
17
18
19
20
21
22
23
24
25
26
27
28
29
30
31
32
33
34
35
36
37
38
39
40
41
42
43
44
public class NioFileDemo {
public static void main(String[] args) {
NioFileDemo demo = new NioFileDemo();
demo.writeFile();
demo.readFile();
}

// 使用 NIO 写入文件
public void writeFile() {
Path path = Paths.get("logs/itwanger/paicoding.txt");
try {
FileChannel fileChannel = FileChannel.open(path, EnumSet.of(StandardOpenOption.CREATE, StandardOpenOption.WRITE));

ByteBuffer buffer = StandardCharsets.UTF_8.encode("学编程就上技术派");
fileChannel.write(buffer);

System.out.println("写入完成");
fileChannel.close();
} catch (IOException e) {
e.printStackTrace();
}
}

// 使用 NIO 读取文件
public void readFile() {
Path path = Paths.get("logs/itwanger/paicoding.txt");
try {
FileChannel fileChannel = FileChannel.open(path, StandardOpenOption.READ);
ByteBuffer buffer = ByteBuffer.allocate(1024);

int bytesRead = fileChannel.read(buffer);
while (bytesRead != -1) {
buffer.flip();
System.out.println("读取的内容: " + StandardCharsets.UTF_8.decode(buffer));
buffer.clear();
bytesRead = fileChannel.read(buffer);
}

fileChannel.close();
} catch (IOException e) {
e.printStackTrace();
}
}
}

使用 AIO 实现文件的读取和写入

1
2
3
4
5
6
7
8
9
10
11
12
13
14
15
16
17
18
19
20
21
22
23
24
25
26
27
28
29
30
31
32
33
34
35
36
37
38
39
40
41
42
43
44
45
46
47
48
49
50
51
52
53
54
55
56
57
58
59
60
61
62
63
64
65
66
67
68
69
70
public class AioDemo {

public static void main(String[] args) {
AioDemo demo = new AioDemo();
demo.writeFile();
demo.readFile();
}

// 使用 AsynchronousFileChannel 写入文件
public void writeFile() {
// 使用 Paths.get() 获取文件路径
Path path = Paths.get("logs/itwanger/paicoding.txt");
try {
// 用 AsynchronousFileChannel.open() 打开文件通道,指定写入和创建文件的选项。
AsynchronousFileChannel fileChannel = AsynchronousFileChannel.open(path, StandardOpenOption.WRITE, StandardOpenOption.CREATE);

// 将要写入的字符串("学编程就上技术派")转换为 ByteBuffer。
ByteBuffer buffer = StandardCharsets.UTF_8.encode("学编程就上技术派");
// 调用 fileChannel.write() 方法将 ByteBuffer 中的内容写入文件。这是一个异步操作,因此需要使用 Future 对象等待写入操作完成。
Future<Integer> result = fileChannel.write(buffer, 0);
// 等待写操作完成
result.get();

System.out.println("写入完成");
fileChannel.close();
} catch (IOException | InterruptedException | java.util.concurrent.ExecutionException e) {
e.printStackTrace();
}
}

// 使用 AsynchronousFileChannel 读取文件
public void readFile() {
Path path = Paths.get("logs/itwanger/paicoding.txt");
try {
// 指定读取文件的选项。
AsynchronousFileChannel fileChannel = AsynchronousFileChannel.open(path, StandardOpenOption.READ);
// 创建一个 ByteBuffer,用于存储从文件中读取的数据。
ByteBuffer buffer = ByteBuffer.allocate(1024);

// 调用 fileChannel.read() 方法从文件中异步读取数据。该方法接受一个 CompletionHandler 对象,用于处理异步操作完成后的回调。
fileChannel.read(buffer, 0, buffer, new CompletionHandler<Integer, ByteBuffer>() {
@Override
public void completed(Integer result, ByteBuffer attachment) {
// 在 CompletionHandler 的 completed() 方法中,翻转 ByteBuffer(attachment.flip()),然后使用 Charset.forName("UTF-8").decode() 将其解码为字符串并打印。最后,清空缓冲区并关闭文件通道。
attachment.flip();
System.out.println("读取的内容: " + StandardCharsets.UTF_8.decode(attachment));
attachment.clear();
try {
fileChannel.close();
} catch (IOException e) {
e.printStackTrace();
}
}

@Override
public void failed(Throwable exc, ByteBuffer attachment) {
// 如果异步读取操作失败,CompletionHandler 的 failed() 方法将被调用,打印错误信息。
System.out.println("读取失败");
exc.printStackTrace();
}
});

// 等待异步操作完成
Thread.sleep(1000);

} catch (IOException | InterruptedException e) {
e.printStackTrace();
}
}
}

BIO(Blocking I/O):采用阻塞式 I/O 模型,线程在执行 I/O 操作时被阻塞,无法处理其他任务,适用于连接数较少且稳定的场景。
NIO(New I/O 或 Non-blocking I/O):使用非阻塞 I/O 模型,线程在等待 I/O 时可执行其他任务,通过 Selector 监控多个 Channel 上的事件,提高性能和可伸缩性,适用于高并发场景。
AIO(Asynchronous I/O):采用异步 I/O 模型,线程发起 I/O 请求后立即返回,当 I/O 操作完成时通过回调函数通知线程,进一步提高了并发处理能力,适用于高吞吐量场景。

Buffer缓冲区和Channel通道

在 NIO 中,并不是以流的方式来处理数据的,而是以 buffer 缓冲区和 Channel 通道配合使用来处理数据的。可以把 Channel 通道比作铁路,buffer 缓冲区比作成火车(运载着货物),要时刻记住:Channel 不与数据打交道,它只负责运输数据。与数据打交道的是 Buffer 缓冲区.相对于传统 IO 而言,流是单向的。对于 NIO 而言,有了 Channel 通道这个概念,我们的读写都是双向的。

Buffer 缓冲区

Buffer 是缓冲区的抽象类 其中 ByteBuffer 是用得最多的实现类(在通道中读写字节数据)

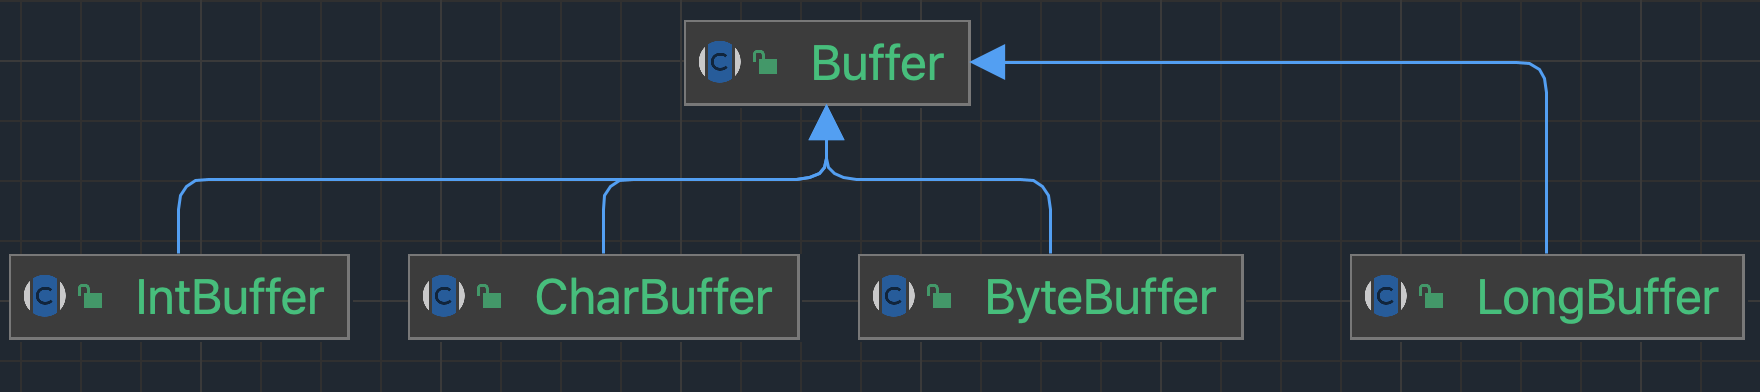
Buffer 类维护了 4 个核心变量来提供关于其所包含的数组信息。它们是:

  • 容量 Capacity 缓冲区能够容纳的数据元素的最大数量。容量在缓冲区创建时被设定,并且永远不能被改变。(不能被改变的原因也很简单,底层是数组嘛)
  • 上界 Limit 缓冲区里的数据的总数,代表了当前缓冲区中一共有多少数据。
  • 位置 Position 下一个要被读或写的元素的位置。Position 会自动由相应的 get()和 put()函数更新。
  • 标记 Mark 一个备忘位置。用于记录上一次读写的位置。

首先展示一下是如何创建缓冲区的,核心变量的值是怎么变化的。

1
2
3
4
5
6
7
8
9
10
11
12
13
14
15
16
17
18
19
20
// 创建一个缓冲区
ByteBuffer byteBuffer = ByteBuffer.allocate(1024);

// 看一下初始时4个核心变量的值
System.out.println("初始时-->limit--->"+byteBuffer.limit());
System.out.println("初始时-->position--->"+byteBuffer.position());
System.out.println("初始时-->capacity--->"+byteBuffer.capacity());
System.out.println("初始时-->mark--->" + byteBuffer.mark());

System.out.println("--------------------------------------");

// 添加一些数据到缓冲区中
String s = "沉默王二";
byteBuffer.put(s.getBytes());

// 看一下初始时4个核心变量的值
System.out.println("put完之后-->limit--->"+byteBuffer.limit());
System.out.println("put完之后-->position--->"+byteBuffer.position());
System.out.println("put完之后-->capacity--->"+byteBuffer.capacity());
System.out.println("put完之后-->mark--->" + byteBuffer.mark());

运行结果:

1
2
3
4
5
6
7
8
9
初始时-->limit--->1024
初始时-->position--->0
初始时-->capacity--->1024
初始时-->mark--->java.nio.HeapByteBuffer[pos=0 lim=1024 cap=1024]
--------------------------------------
put完之后-->limit--->1024
put完之后-->position--->12
put完之后-->capacity--->1024
put完之后-->mark--->java.nio.HeapByteBuffer[pos=12 lim=1024 cap=1024]

现在我想要从缓存区拿数据,怎么拿呀??NIO 给了我们一个flip()方法。这个方法可以改动 position 和 limit 的位置!

1
2
3
4
5
6
// flip()方法
byteBuffer.flip();
System.out.println("flip()方法之后-->limit--->"+byteBuffer.limit());
System.out.println("flip()方法之后-->position--->"+byteBuffer.position());
System.out.println("flip()方法之后-->capacity--->"+byteBuffer.capacity());
System.out.println("flip()方法之后-->mark--->" + byteBuffer.mark());


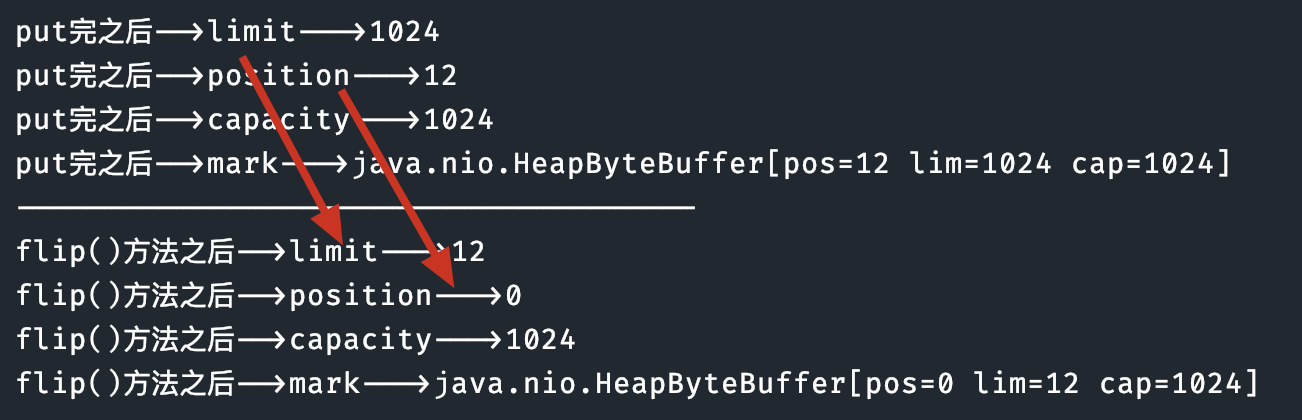
在调用 flip() 之后,limit 变为当前 position 的值(12),position 重置为 0。这意味着你可以从缓冲区的开始位置读取刚刚写入的数据,直到 limit 指定的位置。capacity 保持不变(1024)。当切换成读模式之后,我们就可以读取缓冲区的数据了:

1
2
3
4
5
6
// 创建一个limit()大小的字节数组(因为就只有limit这么多个数据可读)
byte[] bytes = new byte[byteBuffer.limit()];
// 将读取的数据装进我们的字节数组中
byteBuffer.get(bytes);
// 输出数据
System.out.println(new String(bytes, 0, bytes.length));

随后输出一下核心变量的值看看:

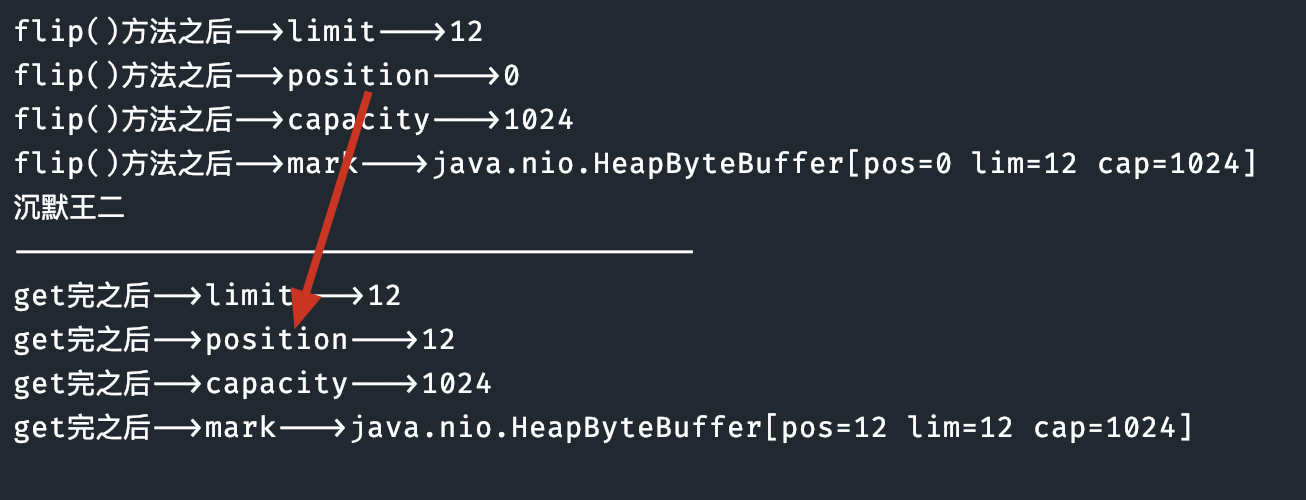
读完如何还想写数据到缓冲区,那就使用clear() 方法,这个方法会“清空”缓冲区,数据没有真正被清空,只是被遗忘掉了

Channel 通道

Channel 通道只负责传输数据、不直接操作数据。操作数据都是通过 Buffer 缓冲区来进行操作!通常,通道可以分为两大类:文件通道和套接字通道。
FileChannel:用于文件 I/O 的通道,支持文件的读、写和追加操作。FileChannel 允许在文件的任意位置进行数据传输,支持文件锁定以及内存映射文件等高级功能。FileChannel 无法设置为非阻塞模式,因此它只适用于阻塞式文件操作。
SocketChannel:用于 TCP 套接字 I/O 的通道。SocketChannel 支持非阻塞模式,可以与 Selector(下文会讲)一起使用,实现高效的网络通信。SocketChannel 允许连接到远程主机,进行数据传输。
与之匹配的有ServerSocketChannel:用于监听 TCP 套接字连接的通道。与 SocketChannel 类似,ServerSocketChannel 也支持非阻塞模式,并可以与 Selector 一起使用。ServerSocketChannel 负责监听新的连接请求,接收到连接请求后,可以创建一个新的 SocketChannel 以处理数据传输。
DatagramChannel:用于 UDP 套接字 I/O 的通道。DatagramChannel 支持非阻塞模式,可以发送和接收数据报包,适用于无连接的、不可靠的网络通信。

文件通道 FileChannel

1
FileChannel.open(Paths.get("docs/配套教程.md"), StandardOpenOption.WRITE);
  1. 使用FileChannel 配合 ByteBuffer 缓冲区实现文件复制的功能:

    1
    2
    3
    4
    5
    6
    7
    8
    9
    10
    11
    try (FileChannel sourceChannel = FileChannel.open(Paths.get("logs/javabetter/itwanger.txt"), StandardOpenOption.READ);
    FileChannel destinationChannel = FileChannel.open(Paths.get("logs/javabetter/itwanger1.txt"), StandardOpenOption.WRITE, StandardOpenOption.CREATE)) {

    ByteBuffer buffer = ByteBuffer.allocate(1024);

    while (sourceChannel.read(buffer) != -1) {
    buffer.flip();
    destinationChannel.write(buffer);
    buffer.clear();
    }
    }

    读取数据后,我们调用 flip() 方法,以便在缓冲区中准备好要写入的数据。然后,我们将缓冲区的内容写入目标文件的 FileChannel(write() 方法)。在写入完成后,我们调用 clear() 方法重置缓冲区,以便在下一次迭代中重用它。

  2. 使用内存映射文件(MappedByteBuffer)的方式实现文件复制的功能(直接操作缓冲区):

    1
    2
    3
    4
    5
    6
    7
    8
    9
    10
    11
    12
    try (FileChannel sourceChannel = FileChannel.open(Paths.get("logs/javabetter/itwanger.txt"), StandardOpenOption.READ);
    FileChannel destinationChannel = FileChannel.open(Paths.get("logs/javabetter/itwanger2.txt"), StandardOpenOption.WRITE, StandardOpenOption.CREATE, StandardOpenOption.READ)) {

    long fileSize = sourceChannel.size();
    MappedByteBuffer sourceMappedBuffer = sourceChannel.map(FileChannel.MapMode.READ_ONLY, 0, fileSize);
    MappedByteBuffer destinationMappedBuffer = destinationChannel.map(FileChannel.MapMode.READ_WRITE, 0, fileSize);

    for (int i = 0; i < fileSize; i++) {
    byte b = sourceMappedBuffer.get(i);
    destinationMappedBuffer.put(i, b);
    }
    }

    MappedByteBuffer 是 Java NIO 中的一个类,它继承自 java.nio.ByteBuffer。MappedByteBuffer 用于表示一个内存映射文件,即将文件的一部分或全部映射到内存中,以便通过直接操作内存来实现对文件的读写。这种方式可以提高文件 I/O 的性能,因为操作系统可以直接在内存和磁盘之间传输数据,无需通过 Java 应用程序进行额外的数据拷贝。

通常与 FileChannel 一起使用,可以通过调用 FileChannel 的 map() 方法创建 MappedByteBuffer 对象。map() 方法接受三个参数:映射模式(FileChannel.MapMode)映射起始位置和映射的长度。
映射模式包括只读模式(READ_ONLY)、读写模式(READ_WRITE)和专用模式(PRIVATE)。
我们设置源文件的 MappedByteBuffer 为只读模式(READ_ONLY),目标文件的 MappedByteBuffer 为读写模式(READ_WRITE)。
在循环中,我们逐字节地从源文件的 MappedByteBuffer 读取数据并将其写入目标文件的 MappedByteBuffer。这样就实现了文件复制功能。利用内存映射文件(MappedByteBuffer)实现的文件复制,可能会比使用 ByteBuffer 的方法更快。
需要注意的是,使用 MappedByteBuffer 进行文件操作时,数据的修改可能不会立即写入磁盘。可以通过调用 MappedByteBuffer 的 force() 方法将数据立即写回磁盘。

  1. 通道之间通过transfer()实现数据的传输(直接操作缓冲区):
    1
    2
    3
    4
    5
    6
    7
    8
    9
    10
    11
    12
    13
    14
    15
    16
    17
    18
    19
    20
    21
    22
    23
    24
    25
    26
    27
    28
    29
    30
    31
    32
    33
    try (FileChannel sourceChannel = FileChannel.open(Paths.get("logs/javabetter/itwanger.txt"), StandardOpenOption.READ);
    FileChannel destinationChannel = FileChannel.open(Paths.get("logs/javabetter/itwanger3.txt"), StandardOpenOption.WRITE, StandardOpenOption.CREATE, StandardOpenOption.READ)) {
    sourceChannel.transferTo(0, sourceChannel.size(), destinationChannel);
    } catch (IOException e) {
    throw new RuntimeException(e);
    }
    ``
    FileChannel 的 transferTo() 方法是一个高效的文件传输方法,它允许将文件的一部分或全部内容直接从源文件通道传输到目标通道(通常是另一个文件通道或网络通道)。这种传输方式可以避免将文件数据在用户空间和内核空间之间进行多次拷贝,提高了文件传输的性能。
    需要注意的是,transferTo() 方法可能无法一次传输所有请求的字节。在实际应用中,你可能需要使用循环来确保所有字节都被传输。
    ```java
    public class FileChannelTransferToLoopExampleWithPaths {
    public static void main(String[] args) {
    Path sourcePath = Paths.get("logs/itwanger/paicoding.txt");
    Path destinationPath = Paths.get("logs/itwanger/paicoding_copy.txt");

    // 使用 try-with-resources 语句确保通道资源被正确关闭
    try (FileChannel sourceChannel = FileChannel.open(sourcePath, StandardOpenOption.READ);
    FileChannel destinationChannel = FileChannel.open(destinationPath, StandardOpenOption.CREATE, StandardOpenOption.WRITE)) {

    long position = 0;
    long count = sourceChannel.size();

    // 循环传输,直到所有字节都被传输
    while (position < count) {
    long transferred = sourceChannel.transferTo(position, count - position, destinationChannel);
    position += transferred;
    }

    } catch (IOException e) {
    e.printStackTrace();
    }
    }
    }
    此外,transferTo() 方法在底层使用了操作系统提供的零拷贝功能(如 Linux 的 sendfile() 系统调用),可以大幅提高文件传输性能。但是,不同操作系统和 JVM 实现可能会影响零拷贝的可用性和性能,因此实际性能可能因环境而异。
    零拷贝(Zero-Copy)是一种优化数据传输性能的技术,它最大限度地减少了在数据传输过程中的 CPU 和内存开销。在传统的数据传输过程中,数据通常需要在用户空间和内核空间之间进行多次拷贝,这会导致额外的 CPU 和内存开销。零拷贝技术通过避免这些多余的拷贝操作,实现了更高效的数据传输。
    在 Java 中,零拷贝技术主要应用于文件和网络 I/O。FileChannel 类的 transferTo() 和 transferFrom() 方法就利用了零拷贝技术,可以在文件和网络通道之间高效地传输数据。https://zhuanlan.zhihu.com/p/83398714

直接与非直接缓冲区

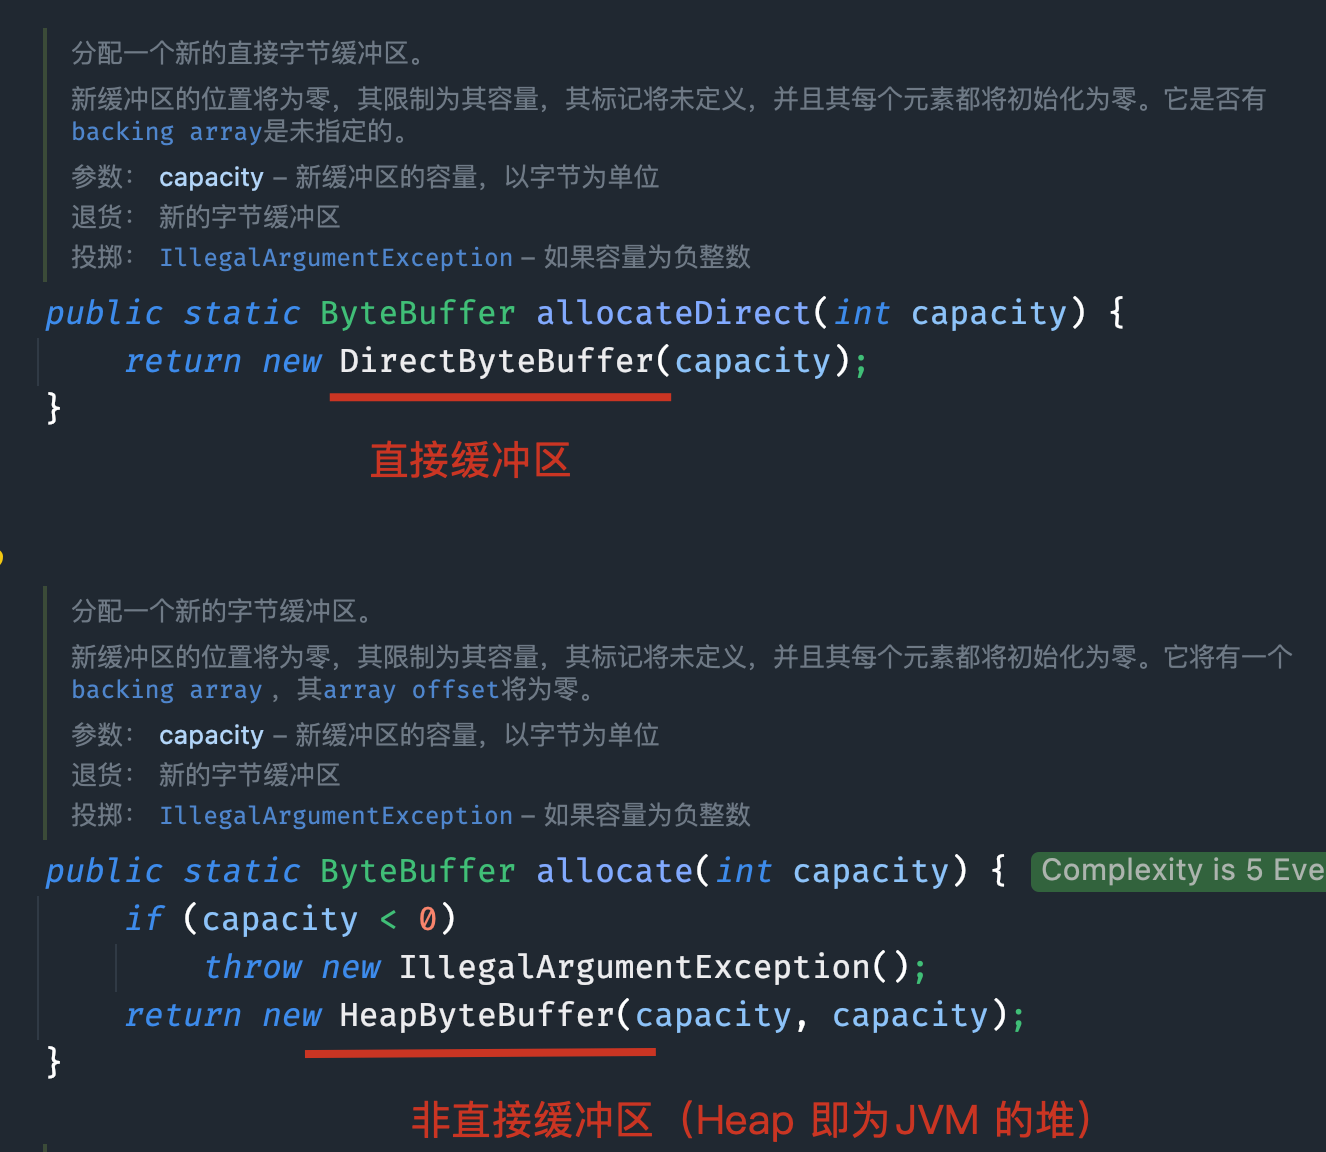
直接缓冲区和非直接缓冲区的差别主要在于它们在内存中的存储方式。这里给出了直接缓冲区和非直接缓冲区的简要概述和区别:
非直接缓冲区:

  • 分配在 JVM 堆内存中
  • 受到垃圾回收的管理
  • 在读写操作时,需要将数据从堆内存复制到操作系统的本地内存,再进行 I/O 操作
  • 创建: ByteBuffer.allocate(int capacity)
    直接缓冲区:
  • 分配在操作系统的本地内存中
  • 不受垃圾回收的管理
  • 在读写操作时,直接在本地内存中进行,避免了数据复制,提高了性能
  • 创建: ByteBuffer.allocateDirect(int capacity)
  • 还有前面提到的 FileChannel.map() 方法,会返回一个类型为 MappedByteBuffer 的直接缓冲区。

    非直接缓冲区存储在JVM内部,数据需要从应用程序(Java)复制到非直接缓冲区,再复制到内核缓冲区,最后发送到设备(磁盘/网络)。而对于直接缓冲区,数据可以直接从应用程序(Java)复制到内核缓冲区,无需经过JVM的非直接缓冲区。

异步文件通道 AsynchronousFileChannel

AsynchronousFileChannel 是 Java 7 引入的一个异步文件通道类,提供了对文件的异步读、写、打开和关闭等操作。

1
2
Path file = Paths.get("example.txt");
AsynchronousFileChannel fileChannel = AsynchronousFileChannel.open(file, StandardOpenOption.READ, StandardOpenOption.WRITE);

AsynchronousFileChannel 提供了两种异步操作的方式:

  1. Future 方式:使用 Future 对象来跟踪异步操作的完成情况。当我们调用一个异步操作(如 read() 或 write())时,它会立即返回一个 Future 对象。可以使用这个对象来检查操作是否完成,以及获取操作的结果。这种方式适用于不需要在操作完成时立即执行其他操作的场景。

    1
    2
    3
    4
    5
    6
    7
    8
    9
    10
    ByteBuffer buffer = ByteBuffer.allocate(1024);
    long position = 0;
    Future<Integer> result = fileChannel.read(buffer, position);

    while (!result.isDone()) {
    // 执行其他操作
    }

    int bytesRead = result.get();
    System.out.println("Bytes read: " + bytesRead);
  2. CompletionHandler 方式,使用一个实现了 CompletionHandler 接口的对象来处理异步操作的完成。我们需要提供一个 CompletionHandler 实现类,重写 completed() 和 failed() 方法,分别处理操作成功和操作失败的情况。当异步操作完成时,系统会自动调用相应的方法。这种方式适用于需要在操作完成时立即执行其他操作的场景。

    1
    2
    3
    4
    5
    6
    7
    8
    9
    10
    11
    12
    13
    14
    15
    ByteBuffer buffer = ByteBuffer.allocate(1024);
    long position = 0;

    fileChannel.read(buffer, position, buffer, new CompletionHandler<Integer, ByteBuffer>() {
    @Override
    public void completed(Integer result, ByteBuffer attachment) {
    System.out.println("Bytes read: " + result);
    }

    @Override
    public void failed(Throwable exc, ByteBuffer attachment) {
    System.err.println("Read failed");
    exc.printStackTrace();
    }
    });

    完整的示例:

    1
    2
    3
    4
    5
    6
    7
    8
    9
    10
    11
    12
    13
    14
    15
    16
    17
    18
    19
    20
    21
    22
    23
    24
    25
    26
    27
    28
    Path path = Paths.get("docs/配套教程.md");

    try (AsynchronousFileChannel fileChannel = AsynchronousFileChannel.open(path, StandardOpenOption.READ)) {
    ByteBuffer buffer = ByteBuffer.allocate(1024);
    long position = 0;

    while (true) {
    Future<Integer> result = fileChannel.read(buffer, position);

    while (!result.isDone()) {
    // 在这里可以执行其他任务,例如处理其他 I/O 操作
    }

    int bytesRead = result.get();
    if (bytesRead <= 0) {
    break;
    }

    position += bytesRead;
    buffer.flip();

    byte[] data = new byte[buffer.limit()];
    buffer.get(data);
    System.out.println(new String(data));

    buffer.clear();
    }
    }

    在这个示例中,我们使用 AsynchronousFileChannel.read() 方法发起异步读取操作。这个方法会返回一个 Future 对象,表示读取操作的结果。我们可以通过调用 isDone() 方法来检查异步操作是否完成。完成后,我们可以通过调用 get() 方法获取实际读取的字节数。
    然后我们来看 CompletionHandler 接口的形式:

    1
    2
    3
    4
    5
    6
    7
    8
    9
    10
    11
    12
    13
    14
    15
    16
    17
    18
    19
    20
    21
    22
    23
    24
    25
    26
    27
    28
    29
    30
    31
    32
    33
    34
    35
    36
    37
    public static void readAllBytes(Path path) throws IOException, InterruptedException {
    AsynchronousFileChannel fileChannel = AsynchronousFileChannel.open(path, StandardOpenOption.READ);
    ByteBuffer buffer = ByteBuffer.allocate(1024);
    AtomicLong position = new AtomicLong(0);
    CountDownLatch latch = new CountDownLatch(1);

    fileChannel.read(buffer, position.get(), null, new CompletionHandler<Integer, Object>() {
    @Override
    public void completed(Integer bytesRead, Object attachment) {
    if (bytesRead > 0) {
    position.addAndGet(bytesRead);
    buffer.flip();
    byte[] data = new byte[buffer.limit()];
    buffer.get(data);
    System.out.print(new String(data));
    buffer.clear();

    fileChannel.read(buffer, position.get(), attachment, this);
    } else {
    latch.countDown();
    try {
    fileChannel.close();
    } catch (IOException e) {
    e.printStackTrace();
    }
    }
    }

    @Override
    public void failed(Throwable exc, Object attachment) {
    System.out.println("Error: " + exc.getMessage());
    latch.countDown();
    }
    });

    latch.await();
    }

Java NIO 中的Paths 和 Files

Java NIO(New I/O)库引入了许多新的功能,其中包括 PathsFiles 这两个重要的类,它们主要用于文件和目录的操作,提供了比传统的 File 类更强大和灵活的功能。

1. Paths

Paths 类用于定位文件系统中的路径,是 java.nio.file.Path 的便捷工厂类。Paths 类的静态方法可以将字符串路径转换为 Path 实例,便于进行进一步的操作。

  • 创建 Path 对象
    使用 Paths.get(String first, String... more) 方法可以轻松创建一个 Path 实例。该方法接受一个字符串或多个字符串参数(代表路径的各个部分)并返回 Path 对象。例如:

    1
    2
    3
    4
    import java.nio.file.Path;
    import java.nio.file.Paths;

    Path path = Paths.get("data", "file.txt");
  • 获取路径信息
    Path 类提供了丰富的路径信息查询方法,如:

    • getFileName(): 获取文件名。
    • getParent(): 获取上级目录路径。
    • getRoot(): 获取根路径。
    • isAbsolute(): 检查路径是否为绝对路径。
    • toAbsolutePath(): 转换为绝对路径。
1
2
3
4
5
6
7
8
9
10
11
12
13
14
15
16
17
18
19
20
21
22
23
24
25
26
27
28
Path path = Paths.get("docs/配套教程.md");

// 获取文件名
System.out.println("File name: " + path.getFileName());

// 获取父目录
System.out.println("Parent: " + path.getParent());

// 获取根目录
System.out.println("Root: " + path.getRoot());

// 将路径与另一个路径结合
Path newPath = path.resolve("config/app.properties");
System.out.println("Resolved path: " + newPath);

// 简化路径
Path normalizedPath = newPath.normalize();
System.out.println("Normalized path: " + normalizedPath);

// 将相对路径转换为绝对路径
Path absolutePath = path.toAbsolutePath();
System.out.println("Absolute path: " + absolutePath);

// 计算两个路径之间的相对路径
Path basePath = Paths.get("/docs/");
Path targetPath = Paths.get("/docs/imgs/itwanger");
Path relativePath = basePath.relativize(targetPath);
System.out.println("Relative path: " + relativePath);

2. Files

Files 类包含大量静态方法,用于操作文件和目录。Files 提供了对文件创建、删除、读取、写入等功能的支持,非常适合进行文件 I/O 操作。

以下是 Files 类中一些常用的方法:

  • 文件和目录的创建和删除

    • createFile(Path path): 创建一个新文件,如果文件已经存在则会抛出异常。
    • createDirectory(Path path): 创建一个新目录。
    • delete(Path path): 删除文件或目录。
    • deleteIfExists(Path path): 如果文件存在则删除,避免异常抛出。
    1
    2
    3
    4
    5
    6
    7
    8
    9
    10
    11
    12
    // 创建一个Path实例
    Path path = Paths.get("logs/javabetter/itwanger4.txt");

    // 创建一个新文件
    Files.createFile(path);

    // 检查文件是否存在
    boolean exists = Files.exists(path);
    System.out.println("File exists: " + exists);

    // 删除文件
    Files.delete(path);
  • 文件读写

    • readAllBytes(Path path): 读取文件内容并以字节数组的形式返回。
    • readAllLines(Path path): 读取文件内容并将每行作为列表中的一个元素返回。
    • write(Path path, byte[] bytes): 将字节数组写入文件。
    • write(Path path, Iterable<? extends CharSequence> lines): 将多行文本写入文件。
    1
    2
    Path path = Paths.get("data", "file.txt");
    List<String> lines = Files.readAllLines(path);
  • 文件属性检查

    • exists(Path path): 检查文件或目录是否存在。
    • isDirectory(Path path): 检查是否为目录。
    • isReadable(Path path): 检查文件是否可读。
    • isWritable(Path path): 检查文件是否可写。
  • 文件复制和移动

    • copy(Path source, Path target, CopyOption... options): 复制文件。
    • move(Path source, Path target, CopyOption... options): 移动或重命名文件。
    1
    2
    3
    Path source = Paths.get("data", "file.txt");
    Path target = Paths.get("data", "copyOfFile.txt");
    Files.copy(source, target);

java.nio.file.Files类提供了大量静态方法,用于处理文件系统中的文件和目录。这些方法包括文件的创建、删除、复制、移动等操作,以及读取和设置文件属性。

下面展示一个 Files 和 Paths 一起使用的示例:

1
2
3
4
5
6
7
8
9
10
11
12
// 创建一个Path实例
Path path = Paths.get("logs/javabetter/itwanger4.txt");

// 创建一个新文件
Files.createFile(path);

// 检查文件是否存在
boolean exists = Files.exists(path);
System.out.println("File exists: " + exists);

// 删除文件
Files.delete(path);

以下是一些常用方法及其示例:

1、exists(Path path, LinkOption... options):检查文件或目录是否存在。

1
2
3
Path path = Paths.get("file.txt");
boolean exists = Files.exists(path);
System.out.println("File exists: " + exists);

LinkOption 是一个枚举类,它定义了如何处理文件系统链接的选项。它位于 java.nio.file 包中。LinkOption 主要在与文件或目录的路径操作相关的方法中使用,以控制这些方法如何处理符号链接。符号链接是一种特殊类型的文件,它在 Unix 和类 Unix 系统(如 Linux 和 macOS)上很常见。在 Windows 上,类似的概念被称为快捷方式。

2、createFile(Path path, FileAttribute<?>... attrs):创建一个新的空文件。

1
2
Path newPath = Paths.get("newFile.txt");
Files.createFile(newPath);

FileAttribute 是一个泛型接口,用于处理各种不同类型的属性。在使用 FileAttribute 时,你需要为其提供一个特定的实现。java.nio.file.attribute 包中的 PosixFileAttributes 类提供了 POSIX(Portable Operating System Interface,定义了许多与文件系统相关的操作,包括文件和目录的创建、删除、读取和修改。)文件属性的实现。

1
2
3
4
5
6
Path path = Paths.get("fileWithPermissions.txt");

Set<PosixFilePermission> permissions = PosixFilePermissions.fromString("rw-r-----");
FileAttribute<Set<PosixFilePermission>> fileAttribute = PosixFilePermissions.asFileAttribute(permissions);

Files.createFile(path, fileAttribute);

PosixFileAttributes 接口提供了获取 POSIX 文件属性的方法,如文件所有者、文件所属的组以及文件的访问权限。以上示例会创建一个读写属性的文件。

3、createDirectory(Path dir, FileAttribute<?>... attrs):创建一个新的目录。

1
2
Path newDir = Paths.get("newDirectory");
Files.createDirectory(newDir);

4、delete(Path path):删除文件或目录。

1
2
Path pathToDelete = Paths.get("fileToDelete.txt");
Files.delete(pathToDelete);

5、copy(Path source, Path target, CopyOption... options):复制文件或目录。

1
2
3
Path sourcePath = Paths.get("sourceFile.txt");
Path targetPath = Paths.get("targetFile.txt");
Files.copy(sourcePath, targetPath, StandardCopyOption.REPLACE_EXISTING);

在 Java NIO 中,有两个实现了 CopyOption 接口的枚举类:StandardCopyOption 和 LinkOption。

StandardCopyOption 枚举类提供了以下两个选项:

  • REPLACE_EXISTING:如果目标文件已经存在,该选项会使 Files.copy() 方法替换目标文件。如果不指定此选项,Files.copy() 方法在目标文件已存在时将抛出 FileAlreadyExistsException。
  • COPY_ATTRIBUTES:此选项表示在复制文件时,尽可能地复制文件的属性(如文件时间戳、权限等)。如果不指定此选项,那么目标文件将具有默认的属性。

6、move(Path source, Path target, CopyOption... options):移动或重命名文件或目录。

1
2
3
Path sourcePath = Paths.get("sourceFile.txt");
Path targetPath = Paths.get("targetFile.txt");
Files.move(sourcePath, targetPath, StandardCopyOption.REPLACE_EXISTING);

7、readAllLines(Path path, Charset cs):读取文件的所有行到一个字符串列表。

1
2
3
Path path = Paths.get("file.txt");
List<String> lines = Files.readAllLines(path, StandardCharsets.UTF_8);
lines.forEach(System.out::println);

8、write(Path path, Iterable<? extends CharSequence> lines, Charset cs, OpenOption... options):将字符串列表写入文件。

1
2
3
Path path = Paths.get("file.txt");
List<String> lines = Arrays.asList("沉默王二 1", "沉默王二 2", "沉默王二 3");
Files.write(path, lines, StandardCharsets.UTF_8);

OpenOption 是 Java NIO 中一个用于配置文件操作的接口。它提供了在使用 Files.newByteChannel()Files.newInputStream()Files.newOutputStream()AsynchronousFileChannel.open()FileChannel.open() 方法时定制行为的选项。

在 Java NIO 中,有两个实现了 OpenOption 接口的枚举类:StandardOpenOption 和 LinkOption。

StandardOpenOption 枚举类提供了以下几个选项:

  • READ:以读取模式打开文件。
  • WRITE:以写入模式打开文件。
  • APPEND:以追加模式打开文件。
  • TRUNCATE_EXISTING:在打开文件时,截断文件的内容,使其长度为 0。仅适用于 WRITE 或 APPEND 模式。
  • CREATE:当文件不存在时创建文件。如果文件已存在,则打开文件。
  • CREATE_NEW:当文件不存在时创建文件。如果文件已存在,抛出 FileAlreadyExistsException。
  • DELETE_ON_CLOSE:在关闭通道时删除文件。
  • SPARSE:提示文件系统创建一个稀疏文件。
  • SYNC:要求每次更新文件的内容或元数据时都进行同步。
  • DSYNC:要求每次更新文件内容时都进行同步。

8、newBufferedReader(Path path, Charset cs) 和 newBufferedWriter(Path path, Charset cs, OpenOption... options):创建 BufferedReader 和 BufferedWriter 对象以读取和写入文件。

1
2
3
4
5
6
7
8
9
10
11
12
13
14
15
Path path = Paths.get("file.txt");

// Read file
try (BufferedReader reader = Files.newBufferedReader(path, StandardCharsets.UTF_8)) {
String line;
while ((line = reader.readLine()) != null) {
System.out.println(line);
}
}

// Write file
Path outputPath = Paths.get("outputFile.txt");
try (BufferedWriter writer = Files.newBufferedWriter(outputPath, StandardCharsets.UTF_8)) {
writer.write("沉默王二");
}

Files.walkFileTree() 静态方法

这个方法可以递归地访问目录结构中的所有文件和目录,并允许您对这些文件和目录执行自定义操作。使用 walkFileTree 方法时,需要提供一个起始路径(起始目录)和一个实现了 FileVisitor 接口的对象。FileVisitor 接口包含四个方法,它们在遍历过程中的不同阶段被调用:

  • preVisitDirectory:在访问目录之前调用。
  • postVisitDirectory:在访问目录之后调用。
  • visitFile:在访问文件时调用。
  • visitFileFailed:在访问文件失败时调用。

来看下面这个示例:

1
2
3
4
5
6
7
8
9
10
11
12
13
14
15
16
17
18
19
20
21
22
23
24
25
26
27
28
29
30
31
32
33
34
35
36
37
38
public class WalkFileTreeExample {
public static void main(String[] args) {
Path startingDir = Paths.get("docs");
MyFileVisitor fileVisitor = new MyFileVisitor();

try {
Files.walkFileTree(startingDir, fileVisitor);
} catch (IOException e) {
e.printStackTrace();
}
}

private static class MyFileVisitor extends SimpleFileVisitor<Path> {
@Override
public FileVisitResult preVisitDirectory(Path dir, BasicFileAttributes attrs) throws IOException {
System.out.println("准备访问目录: " + dir);
return FileVisitResult.CONTINUE;
}

@Override
public FileVisitResult postVisitDirectory(Path dir, IOException exc) throws IOException {
System.out.println("正在访问目录: " + dir);
return FileVisitResult.CONTINUE;
}

@Override
public FileVisitResult visitFile(Path file, BasicFileAttributes attrs) throws IOException {
System.out.println("访问文件: " + file);
return FileVisitResult.CONTINUE;
}

@Override
public FileVisitResult visitFileFailed(Path file, IOException exc) throws IOException {
System.err.println("访问文件失败: " + file);
return FileVisitResult.CONTINUE;
}
}
}

运行结果如下:

1
2
3
4
5
6
7
8
9
10
11
12
13
14
15
16
17
18
19
20
准备访问目录: docs
访问文件: docs/安装环境.md
准备访问目录: docs/imgs
访问文件: docs/imgs/init_03.jpg
准备访问目录: docs/imgs/itwanger
访问文件: docs/imgs/itwanger/tongzhishu.jpeg
访问文件: docs/imgs/itwanger/tongzhishu1.jpeg
访问文件: docs/imgs/itwanger/tongzhishu1.pdf
正在访问目录: docs/imgs/itwanger
访问文件: docs/imgs/init_02.jpg
访问文件: docs/imgs/init_00.jpg
访问文件: docs/imgs/init_01.jpg
访问文件: docs/imgs/init_04.jpg
正在访问目录: docs/imgs
访问文件: docs/服务器启动教程.md
访问文件: docs/配套教程.md
访问文件: docs/约定.md
访问文件: docs/本地开发环境配置教程.md
访问文件: docs/前端工程结构说明.md
正在访问目录: docs

在这个示例中,我们创建了一个名为 MyFileVisitor 的自定义 FileVisitor 类,它扩展了 SimpleFileVisitor 类。SimpleFileVisitor 是 FileVisitor 接口的一个实现,它提供了一些默认的行为。我们可以覆盖 SimpleFileVisitor 中的方法以实现自己的逻辑。在这个例子中,我们只是打印出了访问的文件和目录。然后,我们使用 Files.walkFileTree 方法遍历文件树。这个方法会遍历整个目录结构,并调用 MyFileVisitor 中的相应方法。

其中,FileVisitResult 枚举包含以下四个选项:

  • CONTINUE : 继续
  • TERMINATE : 终止
  • SKIP_SIBLINGS : 跳过兄弟节点,然后继续
  • SKIP_SUBTREE : 跳过子树(不访问此目录的条目),然后继续,仅在 preVisitDirectory 方法返回时才有意义,除此以外和 CONTINUE 相同。

搜索文件

walkFileTree() 方法还可以用于搜索文件,下面这个例子扩展了 SimpleFileVisitor 来查找一个名为 itwanger.txt 的文件:

1
2
3
4
5
6
7
8
9
10
11
12
13
14
15
16
17
18
19
20
21
22
23
24
25
26
27
28
29
30
31
32
33
34
35
36
37
38
39
40
41
42
43
44
45
public class FindFileWithWalkFileTree {
public static void main(String[] args) {
Path startingDir = Paths.get("logs");
String targetFileName = "itwanger.txt";
FindFileVisitor findFileVisitor = new FindFileVisitor(targetFileName);

try {
Files.walkFileTree(startingDir, findFileVisitor);
if (findFileVisitor.isFileFound()) {
System.out.println("找到文件了: " + findFileVisitor.getFoundFilePath());
} else {
System.out.println("ooh,文件没找到");
}
} catch (IOException e) {
e.printStackTrace();
}
}

private static class FindFileVisitor extends SimpleFileVisitor<Path> {
private String targetFileName;
private Path foundFilePath;

public FindFileVisitor(String targetFileName) {
this.targetFileName = targetFileName;
}

public boolean isFileFound() {
return foundFilePath != null;
}

public Path getFoundFilePath() {
return foundFilePath;
}

@Override
public FileVisitResult visitFile(Path file, BasicFileAttributes attrs) throws IOException {
String fileName = file.getFileName().toString();
if (fileName.equals(targetFileName)) {
foundFilePath = file;
return FileVisitResult.TERMINATE;
}
return FileVisitResult.CONTINUE;
}
}
}

在主方法中,我们使用 Files.walkFileTree 方法遍历文件树,并传递一个起始目录和 FindFileVisitor 实例。遍历完成后,我们检查是否找到了目标文件,如果找到了,就打印出它的路径。##

NIO实现网络聊天室

Scatter 和 Gather

Scatter 和 Gather 是 Java NIO 中两种高效的 I/O 操作,用于将数据分散到多个缓冲区或从多个缓冲区中收集数据。

Scatter(分散):它将从 Channel 读取的数据分散(写入)到多个缓冲区。这种操作可以在读取数据时将其分散到不同的缓冲区,有助于处理结构化数据。例如,我们可以将消息头、消息体和消息尾分别写入不同的缓冲区。
Gather(聚集):与 Scatter 相反,它将多个缓冲区中的数据聚集(读取)并写入到一个 Channel。这种操作允许我们在发送数据时从多个缓冲区中聚集数据。例如,我们可以将消息头、消息体和消息尾从不同的缓冲区中聚集到一起并写入到同一个 Channel。

1
2
3
4
5
6
7
8
9
10
11
12
13
14
15
16
17
18
19
20
21
22
23
24
25
26
27
28
29
30
31
32
33
34
35
36
37
38
39
40
// 服务端
// 创建一个ServerSocketChannel
ServerSocketChannel serverSocketChannel = ServerSocketChannel.open();
serverSocketChannel.socket().bind(new InetSocketAddress(9000));

// 接受连接
SocketChannel socketChannel = serverSocketChannel.accept();

// Scatter:分散读取数据到多个缓冲区
ByteBuffer headerBuffer = ByteBuffer.allocate(128);
ByteBuffer bodyBuffer = ByteBuffer.allocate(1024);

ByteBuffer[] buffers = {headerBuffer, bodyBuffer};

long bytesRead = socketChannel.read(buffers);

// 输出缓冲区数据
headerBuffer.flip();
while (headerBuffer.hasRemaining()) {
System.out.print((char) headerBuffer.get());
}

System.out.println();

bodyBuffer.flip();
while (bodyBuffer.hasRemaining()) {
System.out.print((char) bodyBuffer.get());
}

// Gather:聚集数据从多个缓冲区写入到Channel
ByteBuffer headerResponse = ByteBuffer.wrap("Header Response".getBytes());
ByteBuffer bodyResponse = ByteBuffer.wrap("Body Response".getBytes());

ByteBuffer[] responseBuffers = {headerResponse, bodyResponse};

long bytesWritten = socketChannel.write(responseBuffers);

// 关闭连接
socketChannel.close();
serverSocketChannel.close();
1
2
3
4
5
6
7
8
9
10
11
12
13
14
15
16
17
18
19
20
21
22
23
24
25
26
27
28
29
30
31
32
33
34
35
36
// 客户端
// 创建一个SocketChannel
SocketChannel socketChannel = SocketChannel.open();
socketChannel.connect(new InetSocketAddress("localhost", 9000));

// 发送数据到服务器
String header = "Header Content";
String body = "Body Content";

ByteBuffer headerBuffer = ByteBuffer.wrap(header.getBytes());
ByteBuffer bodyBuffer = ByteBuffer.wrap(body.getBytes());

ByteBuffer[] buffers = {headerBuffer, bodyBuffer};
socketChannel.write(buffers);

// 从服务器接收数据
ByteBuffer headerResponseBuffer = ByteBuffer.allocate(128);
ByteBuffer bodyResponseBuffer = ByteBuffer.allocate(1024);

ByteBuffer[] responseBuffers = {headerResponseBuffer, bodyResponseBuffer};

long bytesRead = socketChannel.read(responseBuffers);

// 输出接收到的数据
headerResponseBuffer.flip();
while (headerResponseBuffer.hasRemaining()) {
System.out.print((char) headerResponseBuffer.get());
}

bodyResponseBuffer.flip();
while (bodyResponseBuffer.hasRemaining()) {
System.out.print((char) bodyResponseBuffer.get());
}

// 关闭连接
socketChannel.close();

异步套接字通道 AsynchronousSocketChannel 和 AsynchronousServerSocketChannel

AsynchronousSocketChannel 和 AsynchronousServerSocketChannel 是 Java 7 引入的异步 I/O 类,分别用于处理异步客户端 Socket 和服务器端 ServerSocket。异步 I/O 允许在 I/O 操作进行时执行其他任务,并在操作完成时接收通知,提高了并发处理能力。

1
2
3
4
5
6
7
8
9
10
11
12
13
14
15
16
17
18
19
20
21
22
23
24
25
26
27
28
29
30
31
32
33
34
public class AsynchronousServer {
public static void main(String[] args) throws IOException, InterruptedException {
AsynchronousServerSocketChannel server = AsynchronousServerSocketChannel.open();
server.bind(new InetSocketAddress("localhost", 5000));

System.out.println("服务器启动");

server.accept(null, new CompletionHandler<AsynchronousSocketChannel, Void>() {
@Override
public void completed(AsynchronousSocketChannel client, Void attachment){
// 接收下一个连接请求
server.accept(null, this);
ByteBuffer buffer = ByteBuffer.allocate(1024);
Future<Integer> readResult = client.read(buffer);

try{
readResult.get();
buffer.flip();
String message = new String(buffer.array(), 0, buffer.remaining());
System.out.println("接收到的消息" + message);
}catch (Exception e){
e.printStackTrace();
}
}

@Override
public void failed(Throwable exc, Void attachment) {
exc.printStackTrace();
}
});
// 为了让服务器继续运行,我们需要组织main县城退出
Thread.currentThread().join();
}
}

在 Java 中,Future 是一种用于表示异步计算结果的接口。它提供了一种在异步任务完成后获取结果的机制。上面的代码中使用了 Future<Integer>,它的作用是表示 client.read(buffer) 方法的异步读取操作的结果。

Future 的作用

  • 异步操作:在 client.read(buffer) 中,read 方法是异步的,这意味着它不会立即返回读取的字节数,而是立即返回一个 Future 对象来表示读取操作的状态。
  • 获取结果:通过调用 Future 对象的 get() 方法,可以等待操作完成并获得最终的读取结果。此时,如果读取操作还没有完成,get() 会阻塞当前线程,直到读取操作完成后返回结果。
  • 控制任务完成状态Future 还提供了 isDone() 等方法,可以在不阻塞的情况下检查任务是否完成,从而让程序更灵活地处理异步操作。

示例流程说明

  1. 当客户端连接时,服务器会创建一个 ByteBuffer 来接收数据。
  2. client.read(buffer) 发起异步读取,并立即返回一个 Future<Integer>
  3. 通过 readResult.get() 阻塞当前线程,直到读取完成。
  4. 一旦读取完成,代码将 buffer 的内容转换为字符串,并输出到控制台。
1
2
3
4
5
6
7
8
9
10
11
12
13
14
15
16
17
18
19
20
21
22
23
24
// 客户端
public class AsynchronousClient {
public static void main(String[] args) {
try {
AsynchronousSocketChannel client = AsynchronousSocketChannel.open();
Future<Void> connectResult = client.connect(new InetSocketAddress("localhost", 5000));
connectResult.get();

String message = "哈里独家阿";
ByteBuffer buffer = ByteBuffer.wrap(message.getBytes(StandardCharsets.UTF_8));
Future<Integer> writeResuilt = client.write(buffer);
writeResuilt.get();

System.out.println("消息发送完毕");
client.close();
} catch (IOException e) {
throw new RuntimeException(e);
} catch (ExecutionException e) {
throw new RuntimeException(e);
} catch (InterruptedException e) {
throw new RuntimeException(e);
}
}
}

简单聊天室代码

1
2
3
4
5
6
7
8
9
10
11
12
13
14
15
16
17
18
19
20
21
22
23
24
25
26
27
28
29
30
31
32
33
34
35
36
37
38
39
40
41
42
43
44
45
46
47
48
49
50
51
52
53
54
55
56
57
58
59
60
61
62
63
64
65
66
67
68
69
70
71
72
public class Chat2Server {
public static void main(String[] args) throws IOException {
// 创建一个 ServerSocketChannel
ServerSocketChannel serverSocketChannel = ServerSocketChannel.open();
serverSocketChannel.configureBlocking(false);
serverSocketChannel.bind(new InetSocketAddress(8080));

// 创建一个selector
Selector selector = Selector.open();
serverSocketChannel.register(selector, SelectionKey.OP_ACCEPT);
System.out.println("聊天室服务端启动了");

// 客户端连接
AtomicReference<SocketChannel> clientRef = new AtomicReference<>();

// 从控制台读取输入并发送给客户端
Thread sendMessageThread = new Thread(() -> {
try(BufferedReader reader = new BufferedReader(new InputStreamReader(System.in))){
while(true){
System.out.println("输入服务器消息");
String message = reader.readLine();
SocketChannel client = clientRef.get();
if(client != null && client.isConnected()){
ByteBuffer buffer = ByteBuffer.wrap((message + "\n").getBytes());
client.write(buffer);
}
}
} catch (IOException e) {
throw new RuntimeException(e);
}
});
sendMessageThread.start();

while (true){
int readyChannels = selector.select();

if(readyChannels == 0){
continue;
}

Set<SelectionKey> selectionKeys = selector.selectedKeys();
Iterator<SelectionKey> keyIterator = selectionKeys.iterator();

while(keyIterator.hasNext()){
SelectionKey key = keyIterator.next();

if(key.isAcceptable()){
// 接受客户端连接
SocketChannel client = serverSocketChannel.accept();
System.out.println("客户端连接");
client.configureBlocking(false);
client.register(selector, SelectionKey.OP_READ);
clientRef.set(client);
}else if(key.isReadable()){
// 读取客户端消息
SocketChannel channel = (SocketChannel) key.channel();
ByteBuffer buffer = ByteBuffer.allocate(1024);
int bytesRead = channel.read(buffer);

if(bytesRead > 0){
buffer.flip();
byte[] bytes = new byte[buffer.remaining()];
buffer.get(bytes);
String message = new String(bytes).trim();
System.out.println("客户端消息" + message);
}
}
keyIterator.remove();
}
}
}
}
1
2
3
4
5
6
7
8
9
10
11
12
13
14
15
16
17
18
19
20
21
22
23
24
25
26
27
28
29
30
31
32
33
34
35
36
37
38
39
40
41
42
43
44
45
46
47
48
49
50
51
52
53
54
55
56
57
58
59
60
61
62
63
64
public class Chat2Client {
public static void main(String[] args) throws IOException {
// 创建一个socketChannel
SocketChannel socketChannel = SocketChannel.open();
socketChannel.configureBlocking(false);
socketChannel.connect(new InetSocketAddress("localhost", 8080));

// 创建一个selector
Selector selector = Selector.open();
socketChannel.register(selector, SelectionKey.OP_CONNECT);

// 哦嗯控制台读取输入并发送给服务器端
Thread senMessageThread = new Thread(() -> {
try (BufferedReader reader = new BufferedReader(new InputStreamReader(System.in))){
while (true){
System.out.println("输入客户端消息");;
String message = reader.readLine();
if(socketChannel.isConnected()){
ByteBuffer buffer = ByteBuffer.wrap((message + "\n").getBytes());
socketChannel.write(buffer);
}
}
}catch (IOException e) {
throw new RuntimeException(e);
}
});
senMessageThread.start();

while (true){
int readyChannels = selector.select();

if(readyChannels == 0){
continue;
}

Set<SelectionKey> selectionKeys = selector.selectedKeys();
Iterator<SelectionKey> keyIterator = selectionKeys.iterator();

while(keyIterator.hasNext()){
SelectionKey key = keyIterator.next();

if(key.isConnectable()){
// 连接到服务器
socketChannel.finishConnect();
socketChannel.register(selector, SelectionKey.OP_READ);
System.out.println("已连接到服务器");
}else if(key.isReadable()){
// 读取服务器消息
ByteBuffer buffer = ByteBuffer.allocate(1024);
int bytesRead = socketChannel.read(buffer);

if(bytesRead > 0){
buffer.flip();
byte[] bytes = new byte[buffer.remaining()];
buffer.get(bytes);
String message = new String(bytes).trim();
System.out.println("服务器消息" + message);
}
}
keyIterator.remove();
}
}
}
}

前面我们了解到,Java NIO 在文件 IO 上的性能其实和传统 IO 差不多,甚至在处理大文件的时候还有些甘拜下风,但 NIO 的主要作用体现在网络 IO 上,像 Netty 框架底层其实就是 NIO,我们来做一下简单的总结吧。
SocketChannel(用于 TCP 连接)和 ServerSocketChannel(用于监听和接受新的 TCP 连接)可以用来替代传统的 Socket 和 ServerSocket 类,提供非阻塞模式。
NIO 支持阻塞和非阻塞模式。非阻塞模式允许程序在等待 I/O 时执行其他任务,从而提高并发性能。非阻塞模式的实现依赖于 Selector,它可以监控多个通道上的 I/O 事件。
NIO 支持将数据分散到多个 Buffer(Scatter)或从多个 Buffer 收集数据(Gather),提供了更高效的数据传输方式。
Java NIO.2 引入了 AsynchronousSocketChannel 和 AsynchronousServerSocketChannel,这些类提供了基于回调的异步 I/O 操作。异步套接字通道可以在完成 I/O 操作时自动触发回调函数,从而实现高效的异步处理。

Java IO模型

阻塞 I/O(Blocking I/O):在这种模型中,I/O 操作是阻塞的,即执行 I/O 操作时,线程会被阻塞,直到操作完成。在阻塞 I/O 模型中,每个连接都需要一个线程来处理。因此,对于大量并发连接的场景,阻塞 I/O 模型的性能较差。

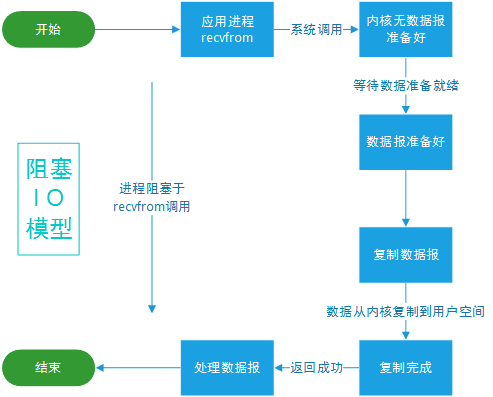
非阻塞 I/O(Non-blocking I/O):在这种模型中,I/O 操作不会阻塞线程。当数据尚未准备好时,I/O 调用会立即返回。线程可以继续执行其他任务,然后在适当的时候再次尝试执行 I/O 操作。非阻塞 I/O 模型允许单个线程同时处理多个连接,但可能需要在应用程序级别进行复杂的调度和管理。

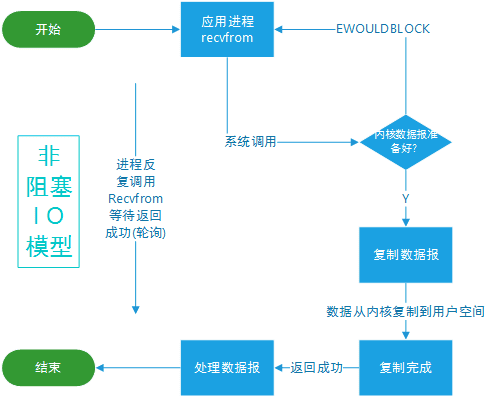
在上面的两幅图中,涉及到了两个概念:内核空间和用户空间。我们之前在介绍非直接缓冲区的时候,有这样一副图片。

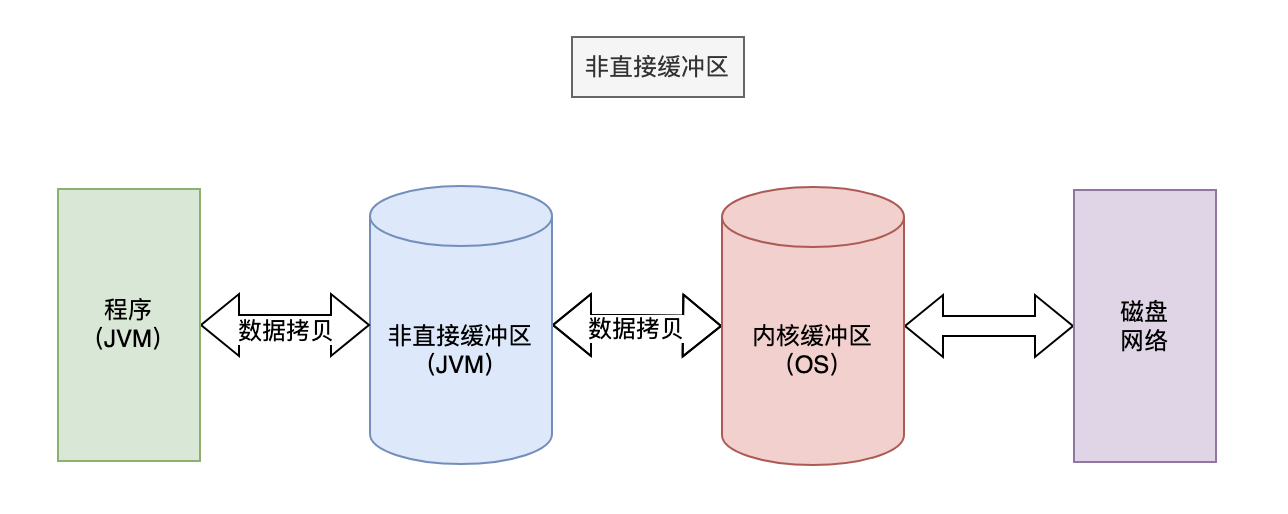
除了前面提到的阻塞 IO 和非阻塞 IO 模型,还有另外三种 IO 模型,分别是多路复用、信号驱动和异步 IO。

多路复用

I/O 多路复用(I/O Multiplexing)模型使用操作系统提供的多路复用功能(如 select、poll、epoll 等),使得单个线程可以同时处理多个 I/O 事件。当某个连接上的数据准备好时,操作系统会通知应用程序。这样,应用程序可以在一个线程中处理多个并发连接,而不需要为每个连接创建一个线程。

  • select 是 Unix 系统中最早的 I/O 多路复用技术。它允许一个线程同时监视多个文件描述符(如套接字),并等待某个文件描述符上的 I/O 事件(如可读、可写或异常)。select 的主要问题是性能受限,特别是在处理大量文件描述符时。这是因为它使用一个位掩码来表示文件描述符集,每次调用都需要传递这个掩码,并在内核和用户空间之间进行复制。
  • poll 是对 select 的改进。它使用一个文件描述符数组而不是位掩码来表示文件描述符集。这样可以避免 select 中的性能问题。然而,poll 仍然需要遍历整个文件描述符数组,以检查每个文件描述符的状态。因此,在处理大量文件描述符时,性能仍然受限。
  • epoll 是 Linux 中的一种高性能 I/O 多路复用技术。它通过在内核中维护一个事件表来避免遍历文件描述符数组的性能问题。当某个文件描述符上的 I/O 事件发生时,内核会将该事件添加到事件表中。应用程序可以使用 epoll_wait 函数来获取已准备好的 I/O 事件,而无需遍历整个文件描述符集。这种方法大大提高了在大量并发连接下的性能。

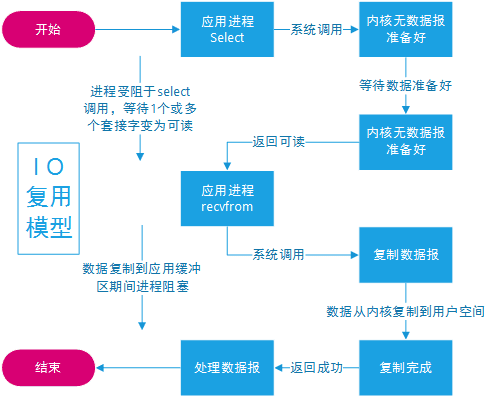
在 Java NIO 中,I/O 多路复用主要通过 Selector 类实现。Selector 能够监控多个 Channel(通道)上的 I/O 事件,如连接、读取和写入。这使得一个线程可以处理多个并发连接,提高了程序的性能和可伸缩性。

1
2
3
4
5
6
7
8
9
10
11
12
13
14
15
16
17
18
19
20
21
22
23
while (true) {
int readyChannels = selector.select();
if (readyChannels == 0) continue;

Set<SelectionKey> selectedKeys = selector.selectedKeys();
Iterator<SelectionKey> keyIterator = selectedKeys.iterator();

while (keyIterator.hasNext()) {
SelectionKey key = keyIterator.next();

if (key.isAcceptable()) {
SocketChannel socketChannel = serverSocketChannel.accept();
socketChannel.configureBlocking(false);
socketChannel.register(selector, SelectionKey.OP_READ);
System.out.println("客户端连接上了: " + socketChannel.getRemoteAddress());
} else if (key.isReadable()) {
// 处理读取数据事件
} else if (key.isWritable()) {
// 处理写入数据事件
}
keyIterator.remove();
}
}

使用 Selector 的 select() 方法等待 I/O 事件。select() 方法会阻塞,直到至少有一个 Channel 上的事件发生。当有事件发生时,可以通过调用 selectedKeys() 方法获取已准备好进行 I/O 操作的 Channel 的 SelectionKey 集合。

信号驱动

信号驱动 I/O(Signal-driven I/O)模型中,应用程序可以向操作系统注册一个信号处理函数,当某个 I/O 事件发生时,操作系统会发送一个信号通知应用程序。应用程序在收到信号后处理相应的 I/O 事件。这种模型与非阻塞 I/O 类似,也需要在应用程序级别进行事件管理和调度。

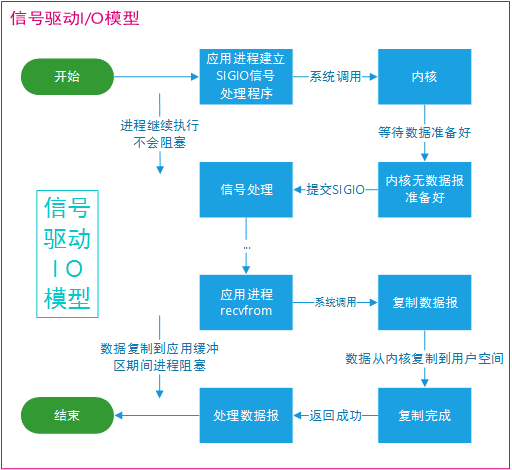
多路复用和信号驱动的差别主要在事件通知机制和引用场景上。

多路复用模型允许一个线程同时管理多个 I/O 连接。这是通过使用特殊的系统调用(如 select、poll 和 epoll)实现的,它们能够监视多个文件描述符上的 I/O 事件。当某个 I/O 事件发生时,这些系统调用会返回,通知应用程序执行相应的 I/O 操作。I/O 多路复用模型适用于高并发、低延迟和高吞吐量的场景,因为它能够有效地减少线程数量和上下文切换开销。

信号驱动模型依赖于信号(如 SIGIO)来通知应用程序 I/O 事件的发生。在这个模型中,应用程序首先设置文件描述符为信号驱动模式,并为相应的信号注册处理函数。当 I/O 事件发生时,内核会发送一个信号给应用程序,触发信号处理函数的执行。然后,应用程序可以在信号处理函数中执行相应的 I/O 操作。I/O 信号驱动模型适用于低并发、低延迟和低吞吐量的场景,因为它需要为每个 I/O 事件创建一个信号和信号处理函数。

Linux 的内核将所有外部设备都看做一个文件来操作,对一个文件的读写操作会调用内核提供的系统命令(api),返回一个 file descriptor(fd,文件描述符)。而对一个Socket的读写也会有响应的描述符,称为 socket fd(Socket文件描述符),描述符就是一个数字,指向内核中的一个结构体(文件路径,数据区等一些属性)。

在Linux下对文件的操作是利用文件描述符(file descriptor)来实现的。

异步 IO

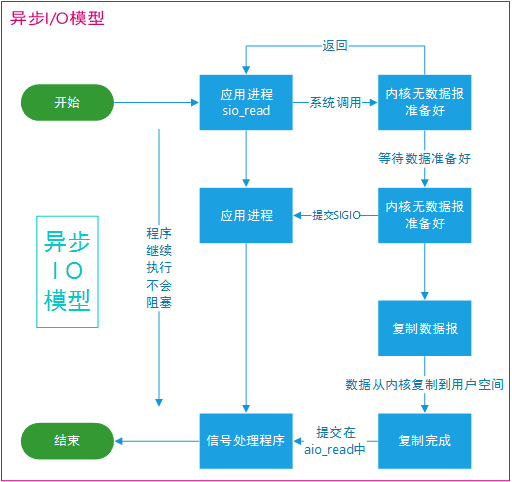
异步 I/O(Asynchronous I/O)模型与同步 I/O 模型的主要区别在于,异步 I/O 操作会在后台运行,当操作完成时,操作系统会通知应用程序。应用程序不需要等待 I/O 操作的完成,可以继续执行其他任务。这种模型适用于处理大量并发连接,且可以简化应用程序的设计和开发。

  • 同步:在执行 I/O 操作时,应用程序需要等待操作的完成。同步操作会导致线程阻塞,直到操作完成。同步 I/O 包括阻塞 I/O、非阻塞 I/O 和 I/O 多路复用。
  • 异步:在执行 I/O 操作时,应用程序不需要等待操作的完成。异步操作允许应用程序在 I/O 操作进行时继续执行其他任务。异步 I/O 模型包括信号驱动 I/O 和异步 I/O。